
Surgical technique of the arthroscopic Latarjet procedure with button fixation
Técnica quirúrgica del Latarjet artroscópico fijado con botones
Introduction
The original Latarjet technique was published in 1954(1), described as the transfer of the coracoid process and fixation with a screw to the anteroinferior portion of the glenoid through a horizontal subscapularis opening(1).
Subsequently, Walch recommended the use of two screws to secure greater bone consolidation(2) and, in 2007, Lafosse for the first time described the procedure carried out via arthroscopy(3).
The main complications are related to the graft (11.7%), recurrence (8%) and material intolerance (6.5%)(4,5). This group in turn can be subdivided into complications caused by failure in the use of screws (malpositioning, migration, loosening or rupture) or situations characterized by irritation or impingement of nearby soft tissues or penetration of the material into the joint, causing damage to the articular cartilage(4). In addition, resorption of the proximal portion of the bone block is frequent, and exposes the upper screw, which may result in damage to the subscapularis or contact with the humeral head, eroding the cartilage(6).
Although the arthroscopic technique allows better visualization of the glenohumeral joint and control of the position of the coracoid, the placement of the screws parallel to the articular surface from the anterior aspect is even more complex than in the open technique. This likewise increases the intraoperative risk of nerve damage, especially to the axillary nerve, the musculocutaneous nerve and the suprascapular nerve if the orientation of the screws is too medial(6,7).
In this context, Pascal Boileau developed a new model of coracoid fixation with a suspension and compression system using metal buttons with the aim of reducing the incidence of complications related to screw fixation. One of the major differences with respect to the arthroscopic technique described by Lafosse is that it preserves the remaining capsulolabral complex, which is repaired after fixation of the coracoid, leaving the latter at extra-articular level and avoiding contact with the humeral head(8).
The aim of this article is to describe the technique, highlighting its main advantages and showing some variations from the original procedure.
Indications
The Latarjet technique is indicated in young patients presenting anterior glenohumeral instability with an isolated bony defect of the anteroinferior glenoid equal to or greater than 20%, and in patients with subcritical glenoid defects in the context of off-track injuries in both primary and salvage surgery.
Instruments
This surgical technique requires the usual instruments for arthroscopic soft tissue stabilization, in addition to several specially designed instruments (Latarjet GuidingSystem®, Smith & Nephew Inc., Andover, MA, USA)(7) and 70° optics:
- Guide for making coracoid orifice. Its extremity simulates a tripod allowing the orifice to be perpendicular to the coracoid and equidistant to the lateral, medial and anterior margins of the coracoid.
- A motorized rasp for preparation of the inferior surface of the coracoid.
- A motorized saw for the coracoid osteotomy.
- Drills (2.8 mm) consisting of an internal Kirschner wire (KW) and an enveloping external cannula.
- A Kirschner wire extractor.
- A glenoid bone tunneling guide with 10° angulation allowing the glenoid to be drilled from posterior to anterior.
- Two retractors or spreaders for safe horizontal opening of the subscapularis. Their structure is similar, although the posterior one has an accessory piece that allows it to be locked in order to prevent its displacement while horizontal opening of the subscapularis is carried out.
- A suture tightener for good coracoid compression.
- Forceps for manipulation and correct positioning of the coracoid.
- Two cannulas of different lengths for atraumatic insertion of the surgical instruments.
- Nitinol or monofilament suture.
- A fixing device: this is a suspension system with high-strength white-colored sutures forming four parallel strands. At one end, these sutures are attached to a 6.5 mm round titanium button with two orifices, and in turn to a smaller diameter white and blue suture. At the opposite end, the white sutures are attached only to a white and blue suture. The posterior button, also made of titanium, has only one orifice through which the high-strength sutures will be placed at the end of the procedure (Figure 1).
reacae.31282.fs2405011en-figure1.png

Figure 1. A: guide for preparing the orifice in the coracoid; B: guide for making a bone tunnel in the glenoid; C: suspension device with high-strength sutures and metal buttons; D: anterior and posterior retractors for horizontal splitting of the subscapularis.
Surgical technique
From the anesthetic point of view, an interscalene block is performed in addition to general anesthesia. The patient is placed in a beach chair with the arm positioned at 60° flexion to relax the deltoid muscle, and at 30° internal rotation to increase the sub-coracoid space(7), avoiding abduction of the arm, as this causes the axillary nerve to come closer to the working area, thus increasing the risk of injury(7). The original technique advises the use of a support to allow arm mobility without the use of traction; however, traction can be used as long as it can be easily withdrawn to allow external rotation of the arm in some steps of the operation.
reacae.31282.fs2405011en-figure2.png
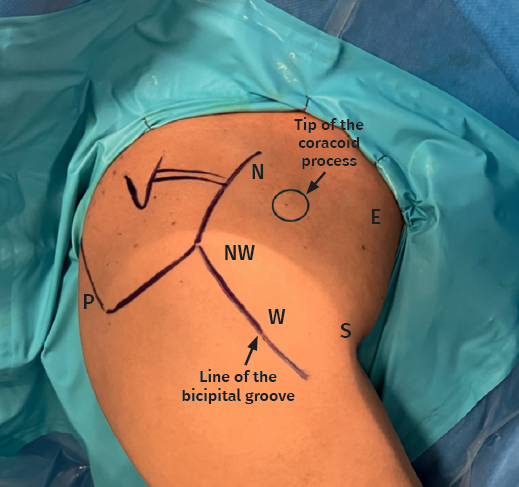
Figure 2. Standard posterior portal (P) and specific arthroscopic portals: northwest (NW), north (N), south (S), west (W) and east (E).
The creation of the working portals is essential for correct performance of the technique, being carried out under direct vision and sequentially as needed (Figure 2).
- Posterior portal (P). The standard posterior portal is created first.
- Northwest portal (NW) at the anterolateral corner of the acromion, through which the intra-articular part will be worked.
- North portal (N), located at the upper part of the coracoid.
- South portal (S), proximal to the axillary fold.
- East portal (E), located 4 cm medial to the conjoint tendon.
- West portal (W), lateral to the conjoint tendon at a midpoint between NW and S.
The technique described by Pascal Boileau uses 70° optics, allowing the first steps of surgery to be performed by placing the camera in the posterior portal. The technique is divided into the stages described in detail below:
- Location and preparation of the coracoid process.
- Disinsertion of the glenoid labrum, preparation of the bone bed in the anteroinferior part of the glenoid, and bone tunnelling.
- Horizontal opening of the subscapularis.
- Position and fixation of the coracoid process.
- Repair of the glenoid labrum.
Location and preparation of the coracoid process. Vision: posterior/working portal: northwest portal
The camera is placed in the posterior portal 1 cm inferior and medial to the posterolateral corner of the acromion(7) and an initial examination is performed to identify the bony deficit of the glenoid, the quality of the glenoid labrum and the Hill-Sachs lesion. It is advisable to be able to perform abduction and external rotation of the arm to confirm the diagnosis of an engaging lesion.
Then, the northwest portal is established at the anterolateral corner of the acromion. The Abbocath used as a reference for creating the portal should run parallel to the upper margin of the subscapularis to ensure that the base of the coracoid is accessed parallel through this portal. With the aid of a vaporizer, the rotator interval is opened, identifying the coracoid and beginning to define it. Resection of the coracoacromial ligament is carried out, identifying the conjoint tendon and cleaning the upper part of the coracoid to progressively expose its entire surface. It is very important to release the coracohumeral ligament well and to separate the fibers of the conjoint tendon of the pectoral muscle in order to obtain good mobilization of the latter. The procedure should be performed while monitoring hemostasis, especially in patients with a larger muscle volume. It should not be forgotten that the musculocutaneous nerve runs posterior to the conjoint tendon, so the release of adhesions should be performed with the utmost caution and always under direct visualization to identify anatomical variants of the nerve that could be located more proximal, and to preserve the vascular pedicle of the coracoid(9) (Figure 3).
reacae.31282.fs2405011en-figure3.png
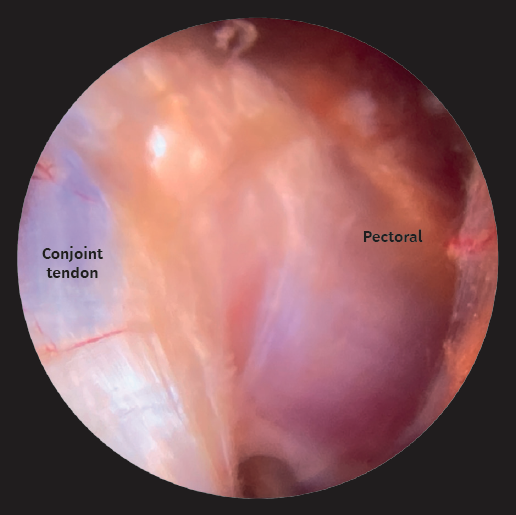
Figure 3. Separation of the pectoral muscle and conjoint tendon fibers, performed with the optics placed from the posterior portal and the vaporizer from the northwest portal.
Then, the northern portal is established, located slightly medial to the coracoid, which allows the pectoralis minor fibers to be safely disinserted from the medial border of the coracoid.
Once the coracoid is free of soft tissue, the inferior surface is prepared with a flat motorized drill positioned from the northwest portal, allowing a smooth and homogeneous area to be obtained that posteriorly fits the anteroinferior margin of the glenoid(9) (Figure 4).
reacae.31282.fs2405011en-figure4.png

Figure 4. Preparation of the lower surface of the coracoid with the camera positioned from the posterior portal and the motorized drill from the northwest portal.
Next, through the north portal, the coracoid guide is positioned with a 45° medial inclination. This guide simulates a tripod; one of the posts should be positioned at the tip of the coracoid allowing the remaining two posts to be positioned at the medial and lateral margin of the coracoid, centering the orifice of the guide at its upper part and positioning the 2.8-mm drill containing a Kirschner wire (KW) and an external cannula. The KW is removed, leaving the cannula at 5 mm from both margins of the coracoid, through which a monofilament suture is inserted and retrieved through the west portal, so that one end of the monofilament is placed in the north portal and the other in the west portal (Figures 5A and 5B).
reacae.31282.fs2405011en-figure5.png

Figure 5. Camera located in the posterior portal with 70° optic. A: from the north portal, the coracoid guide is positioned resting on the upper part of the coracoid; B: cannula placed through the coracoid guide, passing through the coracoid from superior to inferior, with nitinol wire retrieved through the west portal.
The suspension device with the metal button is then knotted to the monofilament in the north portal; by pulling upon the other end of the monofilament, the metal button is positioned on the upper surface of the coracoid. The white sutures are retrieved through the north portal and the white-blue suture through the south portal (Figures 6A and 6B).
reacae.31282.fs2405011en-figure6.png
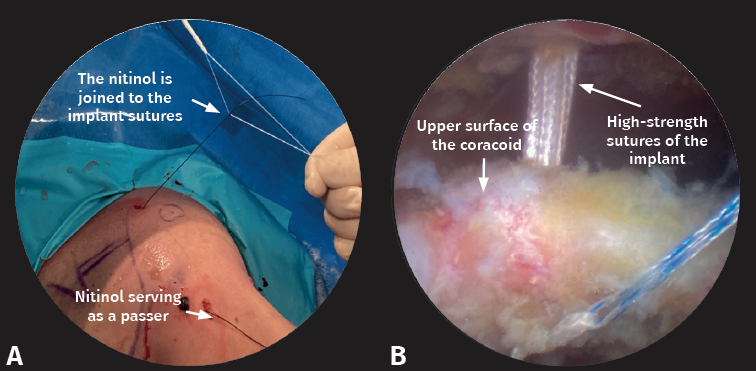
Figure 6. A: the nitinol wire is knotted to the blue-white suture of the implant; B: with the camera positioned in the posterior portal, the nitinol wire acts as an implant suture passer to position the metal button on the upper surface of the coracoid.
Once the device is in place, the coracoid osteotomy is performed with a saw designed for this procedure and that allows the cut to be made from the lower towards the upper surface. The saw is positioned from the northwest portal, and it is very important to ensure a good cutting angle to avoid damaging the already positioned sutures or the previously made orifice. Once the osteotomy has been performed, complete release of the coracoid must be checked, as in many cases there are remaining fibers of the pectoralis minor that have not been disinserted and which may affect its mobilization.
Disinsertion of the glenoid labrum, preparation of the bone bed in the anteroinferior part of the glenoid
The glenoid preparation stage now begins. The camera is still kept in the posterior portal, and from the northwest portal the entire anterior capsulolabral complex is completely disinserted until good mobilization and visualization of the subscapularis fibers is achieved. It is advisable to place a traction suture to allow mobilization of the labrum; the suture can subsequently be used for final capsulolabral reattachment.
The bed is prepared in the anteroinferior part of the glenoid, drilling this area until a straight and smooth surface is obtained where the coracoid is posteriorly positioned. A 1.7-mm all-suture anchor is placed at the 5 o'clock position through the west portal, which will be used for reattachment of the glenoid labrum.
A Wissinger rod is placed in the northwest portal and another through our working cannula to switch the camera position from the posterior portal to the northwest portal. From this view, the glenoid is analyzed from the front, checking drilling of the anteroinferior part and complete disinsertion of the labrum, in case it becomes necessary to extend its disinsertion at the lower part. It is very important to achieve sufficient space so that no soft tissues are in the way when positioning the coracoid.
The Wissinger rod in the posterior part should be parallel to the surface of the glenoid. If oblique positioning is observed, it is better to establish a more medial posterior portal in order to correctly position the working guide, which has an angulation of 10°. Once the effectiveness of the posterior portal has been confirmed, a cannula is inserted, through which the glenoid working guide is positioned.
Sometimes, the posterior capsule can complicate insertion of the guide, requiring a small orifice to be made with the vaporizer, following the trajectory of the cannula.
The position of the guide is critical for correctly performing the bone tunnel; the end of the guide is hook-shaped and should rest at the 4 o'clock position of the anteroinferior part of the glenoid. When drilling, it is important to have obtained a flat surface in order to allow better support of the guide (Figures 7A and 7B).
reacae.31282.fs2405011en-figure7.png

Figure 7. A: with the camera from the northwest portal, the guide is positioned parallel to the glenoid from the posterior portal; B: the guide rests on the anteroinferior part of the glenoid, which has been previously prepared.
Once the guide is positioned, a cannula is attached and supported on the posterior part of the glenoid, through which the 2.8-mm drill is placed, containing a KW and an external cannula for creating the orifice from the posterior part of the glenoid to the anterior part, controlled under direct vision. In many cases, the KW emerges longer than the external cannula enveloping it; care is therefore required not to cross through the subscapularis and damage the plexus. After making the orifice, located at the 4 o'clock position at a distance of 5 mm from the articular surface of the glenoid, the KW is removed, leaving the cannula in position (Figure 8).
reacae.31282.fs2405011en-figure8.png

Figure 8. With the camera from the northwest portal, note the cannula that remains after drilling the orifice from the posterior to the anterior part of the glenoid.
Horizontal opening or split of the subscapularis. Vision: west portal / Work: south portal
The subscapularis split is possibly one of the most difficult and critical steps in this technique. The arm is positioned in slight internal rotation and the camera is placed in the west portal. The vaporizer is introduced in the south portal, and the bursa surrounding the subscapularis is debrided. It is important to identify the anterior axillary vessels, as the musculocutaneous and axillary nerves are located medially to them. Once identified, they are protected by a guard placed from the south portal (Figure 9).
reacae.31282.fs2405011en-figure9.png

Figure 9. Visualization of the axial nerve, positioning the camera from the northwest portal.
It is very important to set the height of the subscapularis split correctly, because if it is too high, positioning of the coracoid becomes complicated due to the direction of traction of the conjoint tendon.
To safely perform the split, the subscapularis muscle is fully exposed, exerting slight external rotation of the arm(7). Under intra-articular vision from the northwest portal, the posterior retractor is placed through the standard posterior portal, positioning it inferior to the previously disinserted capsulolabral complex, which is displaced by the traction suture. Once resting on the subscapularis, we push at the level of the junction between the upper two thirds and the lower third. At this point, the intra-articular view is changed to extra-articular, placing the camera in the west portal and, once it has been verified that the retractor is positioned lateral to the musculocutaneous nerve and the axillary nerve, the longitudinal split is started towards the most lateral part with the vaporizer from the south portal, avoiding injury to the joint capsule(7). The use of a Wissinger rod from the posterior portal before placing the retractor may help to locate the subscapularis splitting point. In order to extend the split medially and gain access to the anteroinferior part of the glenoid, the anterior retractor is positioned from the east portal, ensuring that it is medial to the coracoid and its surrounding sutures.
Position and fixation of the coracoid process. Vision: northwest portal / Work: south portal
Before passing the coracoid through the subscapularis, it is important to check that there is sufficient space to position it. The camera is kept in the northwest portal and a nitinol wire is introduced from the posterior part of the transglenoid cannula to the anterior, picking it up with finger or ring forceps through the north portal, where the white sutures pertaining to the implant are located. It is advisable for the nitinol and white sutures be retrieved at the same time from the north portal in order to avoid adhesions or soft tissue interposition. The blue-white suture at the free end of the metal button is then placed in the nitinol, and traction is carefully applied from the posterior to progressively obtain the suture threads as the coracoid passes through the subscapularis split and is positioned at the anteroinferior part of the glenoid. Occasionally, the lower part of the labrum and the capsule can make this stage difficult; the traction suture and the coracoid grasping forceps thus allow the coracoid to be directed, positioning it correctly, and preventing it from tilting medially (Figure 10).
reacae.31282.fs2405011en-figure10.png

Figure 10. The camera is positioned in the northwest portal to control passage of the coracoid through the subscapularis split, and positioning of the coracoid on the anteroinferior part of the glenoid.
Once the suture strands are in the posterior part, the metal button is placed, checking that the concave part rests on the posterior portion of the glenoid. Then, a Nice knot is made and the tightener is placed posteriorly, starting a temporary compression of 25 N. At this point, rotational corrections can be made to final coracoid placement, and then two additional compressions are applied until a final tension of 100 N is reached. After removal of the tensiometer, three simple knots are tied to obtain the final lock (Figures 11A and 11B).
reacae.31282.fs2405011en-figure11.png

Figure 11. Checking of the position of the coracoid with the camera from: A: the northwest portal; and B: the standard posterior portal.
Repair of the glenoid labrum
The camera is placed in the standard posterior portal and, after checking that the position and fixation of the coracoid is correct, the glenoid labrum is repaired employing the usual Bankart technique and leaving the coracoid located extra-articular(7). Previously, an anchor had been placed at the 5 o'clock position to reinsert the lower part of the labrum, and then another 1.7-mm anchor is positioned at 3 o'clock to afford additional safety and fixation of the repair. The traction suture positioned on the glenoid labrum can be used for reinsertion.
Recommendations of the authors
- It is advisable to position the arm of the patient in a support that allows free mobilization of the arm. If traction is used, it should not be maintained throughout the surgery, in order to avoid neurovascular injury.
- Although initial glenoid labrum disinsertion can be made, it is advisable to start with the coracoid preparation in order to prevent the shoulder from increasing in volume due to the water pressure and making it difficult to establish the arthroscopic portals.
- The glenoid labral traction suture should be placed at the lowest point so that it can be used to repair the labrum.
- In case of difficulties when using the 70°optic, the30°optic can be used instead. For coracoid preparation, the camera is placed from the NW portal and the working portal is an accessory anterolateral portal located at the midpoint between the NW and W portal.
- The coracoid osteotomy should not be performed at the base, in order to prevent damage to the coracoclavicular ligaments and avoid obtaining a very large coracoid fragment that is difficult to position correctly.
- It is essential to position the guide for the transglenoid orifice parallel to the glenoid to avoid excessive lateralization or medialization of the coracoid.
- The posterior retractor or spreader helps us to determine the height of the subscapularis split, for if it is made too high, passage of the coracoid becomes complicated.
- The posterior retractor is opened vertically, while the anterior retractor is opened horizontally (medial to lateral).
- It is advisable to always place the white-blue suture in the nitinol wire (not the high-strength white sutures), in order to avoid difficulties in passing through the orifices.
- When tightening the knot with the tensiometer, it is important to have a direct view of the coracoid to prevent it from tilting medially, and the coracoid forceps or a Wissinger rod can be used to position it correctly.
Postoperative management
After surgery, the shoulder is immobilized in a sling, and it is advisable to maintain neutral rotation to allow healing of the conjoint tendon in the muscular part of the subscapularis and not in the tendinous part(8) - starting pendulum exercises and elbow flexion and extension exercises to avoid stiffness.
After two weeks, the sling can be progressively removed, and passive and active antepulsion exercises can be started, although abduction and external rotation movements are not allowed for the first 6 weeks after surgery. There should be no weight bearing in the first three months, and no sports until the fourth-sixth month postsurgery(8).
Discussion
The development of new surgical techniques for the treatment of shoulder instability has grown exponentially in recent years. The most frequently performed procedure is arthroscopic Bankart surgery, which has recurrence rates of 5-15%(10,11), though some publications report recurrence rates as high as 67%(12,13).
The percentage glenoid bone defect is subject to controversy, although it has been shown to be a determining factor in glenohumeral stability(14) and conditions the therapeutic decision. Glenoid defects of over 20% are undisputed indications for bone block techniques. However, in recent years the literature indicates that glenoid defects greater than 10% may warrant this type of technique if there are associated risk factors(13,15).
The Latarjet technique is an effective option for the treatment of anterior glenohumeral instability with bone deficit. Arthroscopic surgery is controversial. Some of its advantages are the treatment of associated lesions, reduced postoperative pain, and direct visualization of the position of the coracoid(16). In this regard, the malpositioning rates in open surgery range from 20-67%(17)compared to 4-24% in the case of arthroscopic surgery(18). However, it is a complex technique with a long learning curve(16), and is not without complications.
Complications related to the fixation material are observed in both techniques, leading to a continuous search for alternatives to try to solve them. Button suspension systems have been shown to be a good fixation option in clinical and biomechanical studies, with consolidation rates at least equal to those of screw fixation(7). This strategy preserves bone and maximizes the contact area between the coracoid and the anteroinferior part of the glenoid, using only one 2.8-mm orifice compared to the two larger orifices used in the screw technique(7,9).
It has been questioned whether only one pair of metal buttons is sufficient to secure an optimal graft position and consolidation. In this regard, Barret et al. compared the use of one pair and two pairs of buttons, finding no differences in the graft position or consolidation rate, though a 20-minute increase in surgery time was observed(19).
Conclusions
The arthroscopic Latarjet technique is a complex but feasible and safe procedure, provided the technique is followed precisely. Fixation of the coracoid process with metal buttons is an effective option that affords solid fixation of the coracoid without the problems associated with the use of screws.
Figuras

Figure 1. A: guide for preparing the orifice in the coracoid; B: guide for making a bone tunnel in the glenoid; C: suspension device with high-strength sutures and metal buttons; D: anterior and posterior retractors for horizontal splitting of the subscapularis.

Figure 2. Standard posterior portal (P) and specific arthroscopic portals: northwest (NW), north (N), south (S), west (W) and east (E).

Figure 3. Separation of the pectoral muscle and conjoint tendon fibers, performed with the optics placed from the posterior portal and the vaporizer from the northwest portal.
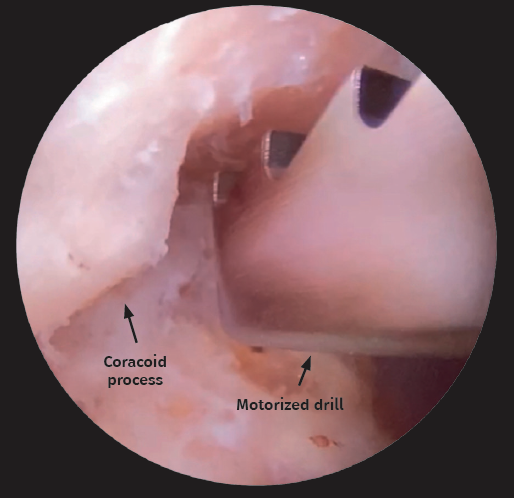
Figure 4. Preparation of the lower surface of the coracoid with the camera positioned from the posterior portal and the motorized drill from the northwest portal.
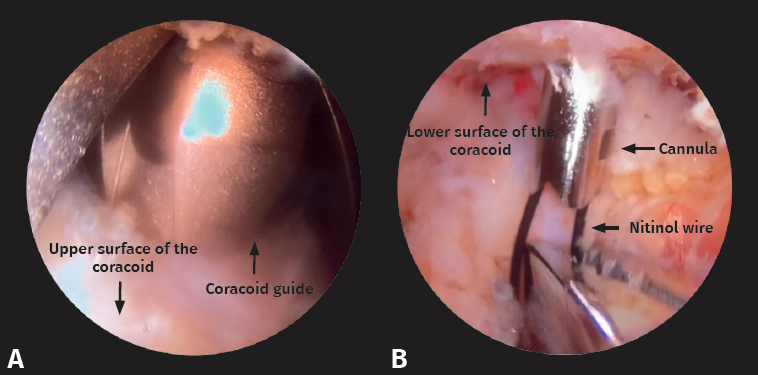
Figure 5. Camera located in the posterior portal with 70° optic. A: from the north portal, the coracoid guide is positioned resting on the upper part of the coracoid; B: cannula placed through the coracoid guide, passing through the coracoid from superior to inferior, with nitinol wire retrieved through the west portal.

Figure 6. A: the nitinol wire is knotted to the blue-white suture of the implant; B: with the camera positioned in the posterior portal, the nitinol wire acts as an implant suture passer to position the metal button on the upper surface of the coracoid.
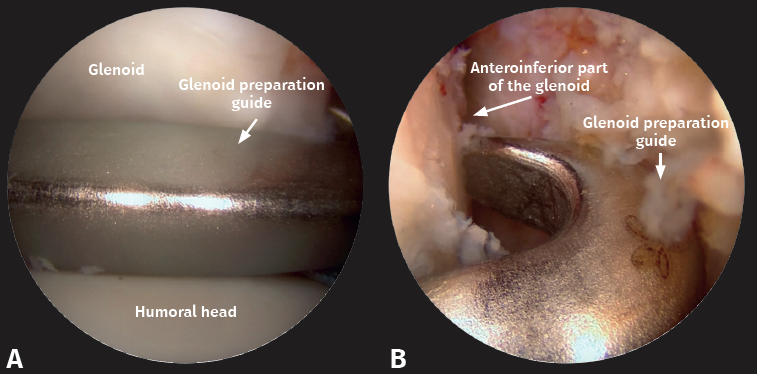
Figure 7. A: with the camera from the northwest portal, the guide is positioned parallel to the glenoid from the posterior portal; B: the guide rests on the anteroinferior part of the glenoid, which has been previously prepared.
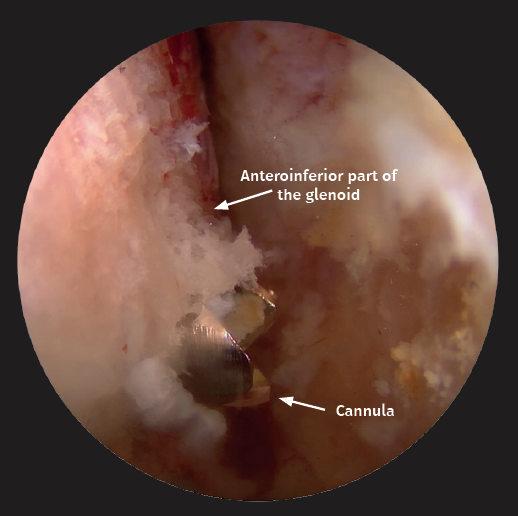
Figure 8. With the camera from the northwest portal, note the cannula that remains after drilling the orifice from the posterior to the anterior part of the glenoid.

Figure 9. Visualization of the axial nerve, positioning the camera from the northwest portal.
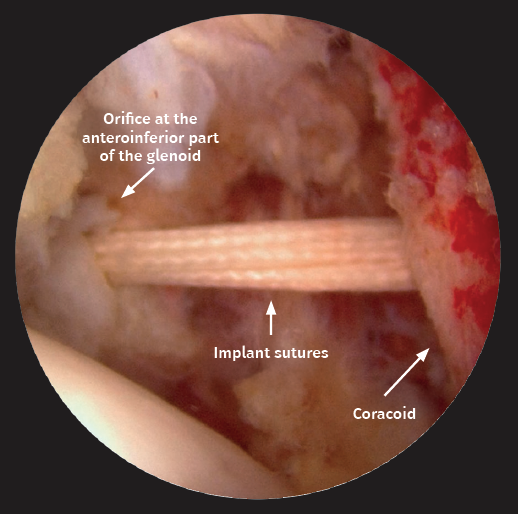
Figure 10. The camera is positioned in the northwest portal to control passage of the coracoid through the subscapularis split, and positioning of the coracoid on the anteroinferior part of the glenoid.
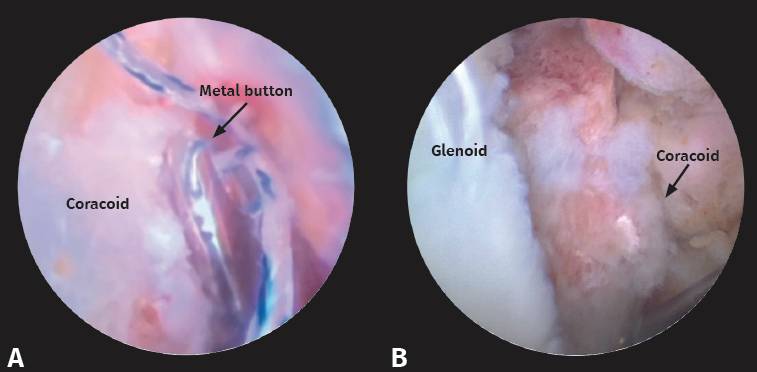
Figure 11. Checking of the position of the coracoid with the camera from: A: the northwest portal; and B: the standard posterior portal.
Información del artículo
Cita bibliográfica
Ethical responsibilities
Conflicts of interest. The authors state that they have no conflicts of interest.
Financial support. This study has received no financial support.
Protection of people and animals. The authors declare that this research has not involved human or animal experimentation.
Data confidentiality. The authors declare that the protocols of their work centre referred to the publication of patient information have been followed.
Right to privacy and informed consent. The authors declare that no patient data appear in this article.
Descargar artículo:
Licencia:
Este contenido es de acceso abierto (Open-Access) y se ha distribuido bajo los términos de la licencia Creative Commons CC BY-NC-ND (Reconocimiento-NoComercial-SinObraDerivada 4.0 Internacional) que permite usar, distribuir y reproducir en cualquier medio siempre que se citen a los autores y no se utilice para fines comerciales ni para hacer obras derivadas.
Comparte este contenido
En esta edición
- Learning from the best
- Everyone's effort
- Inclusion of the long portion of the biceps in rotator cuff repairs
- Surgical technique of the arthroscopic Latarjet procedure with button fixation
- Arthroscopic lateral collateral ligament plication of the elbow
- Arthroscopy-assisted treatment of metacarpophalangeal joint fractures of the fingers
- Surgical technique of hip arthroscopy without perineal post
- Direct reattachment in anterior cruciate ligament ruptures
- Application of fresh osteochondral allografts to the patella. Surgical procedure
- Arthroscopic ligamentoplasty for lateral ankle instability
- Two handles to grasp: double bucket-handle meniscal lesion
Más en PUBMED
Más en Google Scholar
Más en ORCID

Revista Española de Artroscopia y Cirugía Articular está distribuida bajo una licencia de Creative Commons Reconocimiento-NoComercial-SinObraDerivada 4.0 Internacional.